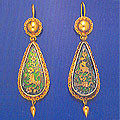


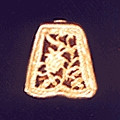
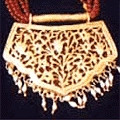
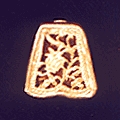
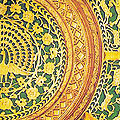
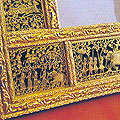
Thewa is a jewelry craft practiced by a handful of artisans who specialise in the art of fusing filigreed gold sheets onto glass. The craft of thewa is practised by these hereditary artisans in the small fortified town of Pratapgarh in district Chittorgarh of south Rajasthan and Rampura in Madhya Pradesh. This unique craft uses plaques of glass as its base material. Till today the tradition of using red, green or blue glass continues. The technique of thewa has been used to create marvellous ornaments, plates, trays and jewelry, as well as small objects for daily use.

CRAFTMEN WORK ENVIRONMENT
Work Place: Indoors
The workroom is sufficiently lit with incoming sunlight. As the work is done mostly during the day, work hours are from a few hours after sunrise till sun set.
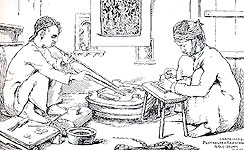
Craftsmen work sitting on the floor on mats. His work table is sufficiently low enough (1′ in height) to be comfortable. Worktable dimensions in terms of the available surface area are approximate 1.5’x2.0′. The surface is with a slight slant towards the craftsman.
Another closed wooden box of similar dimensions is kept near to the work table which stores the tools, implements and certain raw materials. When the craftsman works, he prefers his tools to be placed within easy reach.
About 1.5m. away from the work table the furnace unit is set up in a corner with its relevant tools kept near it.
RAW MATERIALS
PRIMARY RAW MATERIAL (raw materials used/ incorporated in the final product)
SECONDARY RAW MATERIAL (raw materials which are not directly used but help in the processing of the product)
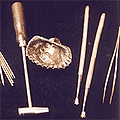
TOOLS
There are a lot of tools used at different stages of the making process and related processes (preparatory and post production)
1. Aron: It is the anvil used to beat gold/silver there are two qualities of aron available and both are used. In the good quality aron, the smoothness of the aron is really good and it is more elastic. Hence the iron hammer strikes the aron without deforming it. It is called Pucca by the craftsman and is used for beating gold. In the bad quality aron, the surface is dented caused due to the low elasticity of the iron. This is also polished by the craftsman and is used for not so delicate or intricate work beating silver. These arons are fixed on a wooden block.
2. Hammer: There are two types of hammer, wooden and iron, used for different purposes. The wooden hammer is used in the making of the gold sheet, to hammer the leather.
3. Draw plate: This is used to draw the metal wire to reduce the thickness of the wire and also to make to wire cross section round.
4. Wire drawing pliers: The wire drawing pliers are pliers with which one can pull at the wire through the wire drawing plate.
5. Wire cutter: The wire cutter is used to cut the wire.
6. Sheet cutter: The sheet cutter is used to cut the metal sheet into strips.
7. T-Anvil: The T-anvil is fixed on to a wooden block for stability. The anvil is used for hammering joint points.
8. Tweezers: Two types of tweezers are used. The first type of tweeter is the bigger tweezers with a pointed tip. It is called the diamond tweezers and is used to do more delicate of the works.
9. Asbestos sheet: An asbestos sheet is used to hold the metal and the soldering work is carried out on it. It is used as it is a bad conductor of heat and one can hold the sheet in one’s hand and work.
10. Spirit lamp: The spirit lamp is used to provide flame for various processes at different stages like, soldering and melting of gold and silver.
11. Blow pipe: There are two types of blow pipes – one big and one small. The big blow pipe is used for the furnace and the small blow pipe is used to direct the flame from the spirit lamp.
12. Chimtas (Tongs): There are small (1cm) iron begs used to hold the gold sheet together while soldering. These are made at home, by the craftsman himself.
13. Wooden block: A flat wooden black about 8″ long and about 5″ wide, about2″ high is used to pour the Ral and it then becomes a permanent tool for fixing the gold sheet and working on it.
14. Iron sheet: Any scrap iron sheet is taken to hold the work piece while it is put in the furnace.
15. Special decorative tools: These tools are used to make the main design on the gold foil. The tools can be classified according to the different processes and uses. All these tools are made by the craftsman himself. The tools are fashioned from cycle spokes or umbrella spokes. These spokes are shaped with the help of files and grinding stone.
16. Ral stirring tools: A flat broadening tools is used to stir the Ral while preparation this tool is also used to spread the Ral over the wooden block. With usage and time, the tool forms a little depression.
17. Diamond cutter:
The diamond cutter is used to cut the glass and etch on it.
18. Cells: 12V cells are used for electroplating.
PROCES OF MAKING THE VADA
Vada is the rectangular cross-section silver wire fame for the gold sheet.
The milled silver wire is first drawn through the drawplate between two rectangular cross-sections.
The wire is bent on the anvil at a point and then manually guided around pre-fabricated geometrical shapes made of thick copper sheets (these shapes are made a little smaller than the frame of the Ghar as these wires frames are supposed to fit in it).
The wire is measured a bit shorter than the perimeters. This is done to adjust the expansion of silver while soldering and beating.
Before the soldering, the wire frame is cut length wise both ends and fit alternatively to solder to a level. This is then soldered and beaten.
PROCESS OF MAKING THE GHAR
Ghar is the silver box that encases the glass with the gold Jali work on it the master o the Ghar is fabricated from copper sheet strips. They form the walls of the case which is then pocked with Ral to make it solid.
A machine milled silver ribbon is cut to the required size. It is then measured around the master. The length is kept slightly smaller then the master perimeter as to adjust the expansion of silver while soldering and beating the ends are cut width-wise and inter-locked.
The base of the Ghar is cut a little bigger then the master base. This is done as the walls are soldered to the base from the inside. The excess is then filled off.
PROCESS OF RAL PREPARTION
Ral is a mixture of three things. It is used for fixing the work piece (i.e.Vada and gold piece.) The process takes 1 hour. And the Ral lasts for 2-3 decades.
Chapdi, oil and terracotta dust are taken in a ratio of 2:1:2, Oil is taken in a vessel and heated. When it becomes hot, Chapdi and oil become viscous, terracotta dust is mixed slowly while stirring the mixture simultaneously. Dust is added for binding and consistency. The consistency is checked at intervals. (a little Ral is taken out and cooled and pressed with a finger nail to check its hardness.) When the Ral is semi-solid, the heat is taken away and the Ral is poured onto a wooden block. The block now is ready to use. Some Ral is also kept separately.
PROCESS OF MAKING THE PRODUCTS
The process followed in thewa work is detailed and intricate. The gold sheet is cut in the desired shape. A previously made Vada is then placed on a mica sheet with the gold touching the mica. These 3 layers of mica, gold and silver Vada are then held together with iron Chimtas to help solder.
The soldered pieces are placed on the outside of the Vada on the gold sheet. The whole arrangement is heated with the flame from the blow pipe to melt and solder. Care is taken so that the previous solder doesn’t get undone. For this Geru is applied on it.
The soldered piece is removed and dipped in diluted sulphuric acid for sometime. Then, the mica sheet is peeled off using the Chimtas. To remove any crimps on the gold sheet it is placed face down on a hard surface and the Vada is lightly hammered.
Pieces of the solidified Ral are placed within the Vada on the gold sheet. This is then heated for the Ral to melt. The melting of the Ral is done by placing the filled wire and gold sheet on a flat iron sheet and placing a mica sheet over the Vada and gold sheet. This is placed in the furnace.
The furnace is made of iron sheets. Coal is used as a fuel and pieces of burning coal are held over the job with tongs and provide heat from above. A blow pipe is sometimes used for direct heating.
The softened Ral is spread all over by pressing it. It is lightly hammered to pack tightly within the Vada and gold sheet. Thus, the gold sheet acquires a suitable base on which it can be worked upon. The Ral is then suddenly cooled by dipping in water to set it.
The extra gold is clipped-off form the sides of the Vada. The outer edges of the Vada are then rubbed on a grinding stone.
The wooden block with the Ral is heated to melt the Ral so that it can be spread and flattened. The A wet piece of thick paper put on it cool and is left thus.
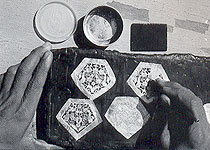
Now the decoration of the gold sheet starts. The first stage, Kardarna, is when just an outline of the motif is etched on the gold sheet. The second stage involves detailing i.e. eyes, ornaments etc. This is called Cheerna. The third stage is when the Jali is cut. This is a delicate process and the waste is collected in a small piece of paper. The waste is in the form of gold sheet plus Ral which is later melted. The gold melts and the Ral burns out.
After cutting the Jali, the block is heated so that the Ral melts a little and when it is melting, the Jali is lifted slowly with a tweezers.
After this the glass is etched with the same metal as in gold in negative i.e. the portion which is left in gold is etched out in glass. Then a solution is applied to the gold Jali and the Jali is placed on the gold etched glass and the glass is heated. This fixes the gold on glass.

ELECTORPLATING OF THE GHAR
The Ghar is gold plated casing. Gold potash, water and gold power are taken and electric current is passed fro the gold to silver Ghar. The gold is kept as negative terminal and the silver Ghar is kept as positive terminal.
FIXING OF THE GLASS IN THE VADA
(With gold Jali work)
TWO METHODS PRACTISED
Traditional method: A glass piece is cut with a diamond cutter to a suitable shape and size to be placed inside the Vada. This arrangement is covered on the side of the gold work with a mica sheet (the mica acts as a non stick surface). A heavy steel stab is placed over the mica sheet. This whole structure is placed again upon a similar sheet slab in the furnace. Due to heat and pressure of the steel block it is probable that the gold is fused with the glass. It happens in a manner in which the gold and the base glass acquire a common surface with no two distinguishable levels.
The work is taken out of the furnace after the glass is seen to turn red hot for a few seconds. It then left for cooling.
Contemporary method: The glass piece to be used is first etched with the design with the help of a diamond cutter. This design is transferred on the gold sheet; by holding the etched side of the glass in a non-oxidizing (yellow) flame, it is covered with a layer of carbon (soot). The etched surface is then pressed on the gold sheet to get a print on it with help of this reference a duplicate of the design is on the gold sheet which gives the Jali work in gold.
FIXING OF THE JALI WORK ON ETCHED GLASS
The etched surface of the glass is coated with a solution which possibly acts as a adhesive when heated. The gold work with the Vada is placed on the etching and fit slowly. This arrangement is placed in the furnace. After the gold fuses with the glass it is removed from the furnace and left to cool. The gold fixes with a level below the surface of the base glass and the etched edge of the glass can be easily felt with ones fingers.
FIXING OF THE GLASS IN GHAR
After the gold plated Ghar is ready, the base is fitted with iron wires (stuck with adhesives; synthetic) to give the glass support inside the Vada the glass with gold is then placed and the Vada top is rested on the glass. In case the piece has to be stung holes are drilled in the sides of the Vada for the string to pass through.
Only gold sheets of the highest purity are used, for this lends itself to the thewa technique. The artisans treat all gold to remove impurities before rolling out and cutting the sheets, usually of 40 gauge thickness. ‘As the work requires intricate detailing and skilful fusion of the gold into the glass base the wastage is high’, says Ganpat Soni, a National Award winner and master in the technique of thewa. ‘Overheating can break the glass or melt the gold. Alternatively, if not treated properly the gold filigree does not fuse well and soon comes off.’ Talking about the initial struggles Soni says: ‘It is only after years of intensive experimentation and many failures that the technique can be perfected.’ Soni now guarantees 98 per cent quality.
The artisans at Rampura have been using Belgian glass, from old windowpanes of houses and buildings, as the base for thewa articles; however, this source has now been exhausted and finding glass with the right colours is becoming increasingly difficult. As a result, thewa pieces can now be found in a new range of colours and materials: lemons, whites, blacks -some original, some obtained by using plastics. Artisans are also experimenting with other metals, including silver.

DESIGNS AND PRODUCTS
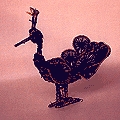
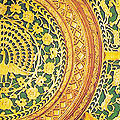
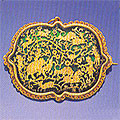
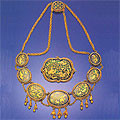
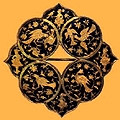
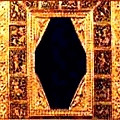
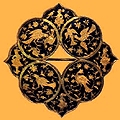
The motifs often depict details from Hindu mythology or Mughal courtly scenes and include floral patterns, historical scenes, the Krishna Leela, elephants, deer, lions and other animals, winged fairies, scenes from the battlefield, portraits of rulers, and the like. Products made by the artisans include jewelry and ornament pieces, boxes, plates, photo frames, belts, perfume bottles and vases. Unlike other gold jewelry the price of a thewa piece lies not in the intrinsic value of gold but the skill required to fashion an article. Unfortunately customers paying Rs 500 for a pair of earrings often question the price as well as the purity of the gold used.
Some of the finest examples of the thewa art can be seen in museums in India and abroad. Presently, in India, the craft is witnessing a revival with thewa jewelry pieces being made available in urban markets. With only a small handful of hereditary artisans practising it, this beautiful craft form needs this very welcome limelight.
MARKET
Nature of Selling: It is only direct selling. They sell their products from home to;
The craftsmen are also called for exhibitions in different cities where they sell their products.